Recently, I was needing to edit a LOT of .tpl files while I was working on a client’s site. I quickly learned after opening the first file that Dreamweaver was dead set on color coding these as regular HTML files. That was going to be too annoying for me and way too much dull blue text to scan through. I thought to myself, ‘hmmm, I wonder if I can force the color-coding of certain file extensions?’
Well, it turns out that you most certainly can. All it takes is some modifications to a few Dreamweaver configuration files and voila! Let’s get started.
Explanation of What the ‘Extensions.txt’ and ‘MMDocumentTypes.xml’ Files Accomplish
There are two important configuration files that Dreamweaver looks at when it initializes so that the program can determine how to properly color code the user input. These two files are:
- Extensions.txt
- MMDocumentTypes.xml
‘Extensions.txt’ contains some basic instructions that defines the extensions that are recognized by Dreamweaver. ‘MMDocumentTypes.xml’ groups those extensions together into color-coding assignments. For instance, a typical ‘Extensions.txt’ file will instruct Dreamweaver that a ‘.html’ extension belongs in the ‘All Documents’ setting while ‘MMDocumentTypes.xml’ will say that ‘.html’, ‘.htm’, ‘.shtml’, etc. are color-coded into the group of ‘HTML’, meaning that they’ll receive the same color coding, generally blue and LOTS of it.
By the standard definitions (at the time of writing this article, we’re using Dreamweaver CS5 on a Windows 7 install), ‘.tpl’ and ‘.inc’ files are both included into the HTML group. We need to switch that grouping to PHP, but first we need to make sure that Dreamweaver is in fact recognizing the ‘.tpl’ and ‘.inc’ file extensions to begin with.
Disclaimer: Before we get into tinkering with these files and potentially causing Dreamweaver to fail to initialize, it’s important to state that we’re strictly dealing with Windows on this. As you will see below, there are Mac definitions in the ‘MMDocumentTypes.xml’ file. However, I’m not a Mac aficionado and therefore won’t presume to tell our Mac audience how to correctly perform this modification. Although, if anybody is willing to port this over for Mac users, I’d gladly incorporate that information into this post and give full credit for it. Email me at: mike at fronterahouse.com or get in touch with me in the comments below.
Step One: Modify the Dreamweaver ‘Extensions.txt’ File to Include the .tpl Extension If It Doesn’t Already Contain the Entries
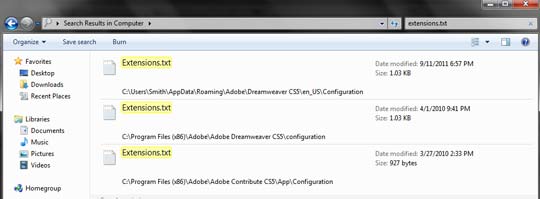
We first need to locate all instances of ‘Extensions.txt’ file in our filesystem. If you’re using Windows Vista or 7, you’re going to be able to search for it on your C:/ (or use the ‘Search in Computer’ option) fairly easily. If you’re using Windows XP, it will be more difficult to find, but typically it will be located at the paths below:
Documents and Settings > %USER% > Application Data > Adobe Dreamweaver > Configuration
Program Files > Adobe > Dreamweaver CS5> configuration > Extensions.txt
* where %USER% = whatever your username is
Side note: If you’re using Windows XP, you really should upgrade. I know that there’s excuses for why people don’t want to upgrade (price, proprietary program compatibility, etc.), but Microsoft is moving full steam ahead and as awesome as Windows XP was, it’s been surpassed by Windows 7 and as evidenced by the upcoming Windows 8, things are moving to the touch interface and FAST. If Windows XP was a military officer, it’d be a five star general, but it’s retired now and wants to be left alone…
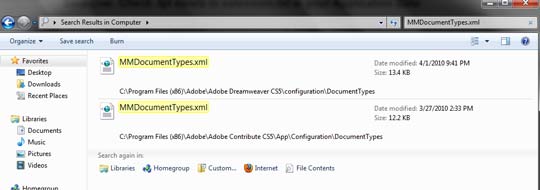
Now in my case, I’m using Windows 7 x64, so my file structure is a bit different. In 64-bit environments, instead of having one single ‘Program Files’ section, you have two: one for x86 and one for x64. Dreamweaver is a 32-bit program, so all of the paths for Dreamweaver will be in the ‘Program Files (x86)’ directory as you’ll see in the screenshots below:


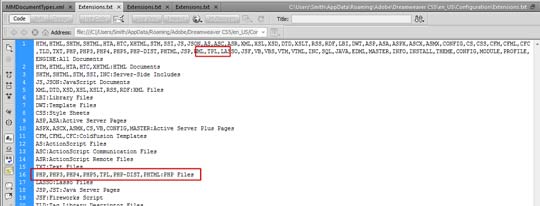
First, look at the multiple lines of all caps letters at the top of the file. If you scan through those, you should find both the ‘TPL’ and ‘INC’ extensions in there. If they aren’t, add them into the top, separating them from the rest of the extensions by commas. Also make sure that they occur before the ‘ENGINE: All Documents’ entry.
Next, we need to make sure that both of these extensions exist in the PHP area that’s further down the page. See the screenshot below for an example on how to add it:

Step Two: Change the Configuration in the ‘MMDocumentTypes.xml’ File to Remove the TPL Entries From HTML Color Coding to PHP Color Coding
We now need to adjust the ‘MMDocumentTypes.xml’ file to move the ‘.tpl’ and ‘.inc’ file extensions from the HTML group to the PHP group. In doing this, we’ll complete the process and the final step will be to restart Dreamweaver and let it re-register these files during the program initialization.
The first line of XML code that we need to locate is on line 3 (or at least that’s the line it’s on in my file). Below is what the unaltered, original code looks like:
<documenttype id="HTML" internaltype="HTML" winfileextension="htm,html,shtml,shtm,stm,tpl,lasso,ssi,inc,jhtml,ccd" macfileextension="htm,html,shtml,shtm,tpl,lasso,ssi,inc,jhtml,ccd" file="Default.html" writebyteordermark="false">
Below is what you need to change it to (copy and paste this if you need to, but be careful that you don’t overwrite anything other than these lines):
<documenttype id="HTML" internaltype="HTML" winfileextension="htm,html,shtml,shtm,stm,lasso,ssi,jhtml,ccd" macfileextension="htm,html,shtml,shtm,lasso,ssi,jhtml,ccd" file="Default.html" writebyteordermark="false">
Now that we’ve removed the ‘.tpl’ and ‘.inc’ extensions from the winfileextension attribute and the macfileextension attribute, we need to add them back into the ‘PHP_MySQL’ section. In my file this line begins on line 84. The unaltered, original XML code is below:
<documenttype id="PHP_MySQL" servermodel="PHP MySQL" internaltype="Dynamic" winfileextension="php,php3,php4,php5,phtml,phtm" macfileextension="php,php3,php4,php5,phtml,phtm" file="Default.php" writebyteordermark="false">
The altered code after adding the extensions where they need to be is as follows (again, feel free to copy and paste this, but I’m going to warn you to be careful again because we don’t want these files to fail initialization when Dreamweaver loads!):
<documenttype id="PHP_MySQL" servermodel="PHP MySQL" internaltype="Dynamic" winfileextension="php,php3,php4,php5,phtml,phtm,tpl,inc" macfileextension="php,php3,php4,php5,phtml,phtm,tpl,inc" file="Default.php" writebyteordermark="false">
Conclusion
Now that we’ve finished these tedious steps, the final task is to restart Dreamweaver. After it loads, check to make sure that the ‘.tpl’ and ‘.inc’ files are color coded as necessary and enjoy!

8 Comments
Great, worked like a charm! Thank you for sharing. Running Dreamweaver CS5, Win7 32-bit
August 4th, 2014 at 3:22 pm
Any dieas how to achieve this in Dreamweaver CC (creative cloud) I have tried all these ideas, and it simply does not work.
November 26th, 2014 at 4:15 pm
Hi Laura,
Unfortunately, I’ve never tried CC. Perhaps they modified the color-coding functionality in the newest version. Most of all the settings are stored via XML in CS6 and I would imagine they’d be similar in CC. Have you tried searching for colors.xml and changing values in there? Hope you find your answer!
November 28th, 2014 at 9:04 am
Great article.
December 4th, 2014 at 10:43 am
It works. Thanks for help
July 4th, 2015 at 5:12 am
Thanks, it worked.
July 23rd, 2015 at 6:09 pm
Sorry, doesn’t work – same method as every other site, but I just cannot get it to work!
August 6th, 2015 at 4:46 am
does not work for me in Dreamweaver cs 6 pro,if have any solution for me please reply.
December 28th, 2015 at 10:54 pm